This is a guide on How to install cyberpanel on centos7 server in 2020
*please start with a fresh deployment of centos7 that has not been used before
Cyberpanel is an opensource web hosting control panel powered by OpenLiteSpeed. Built for speed, security, and reliability
It is totally free and does not requires any kind of license
Requirements
- Centos 7.x, Centos 8.x, Ubuntu 18.04, Ubuntu 20.04 (Its highly recommended to use Centos7 even in 2021)
- 1gb or more Ram (1gb will be enough but it is highly recommended to get at least 2gb of ram)
- At least 10GB Disk Space
- * If you want to send emails from your cyberpanel then use one of these providers that open port 25:-
- Digital ocean – (Free 100$ to try it out)
- Vultur – (Free 100$ to try it out)
- lindoe – (free 100$ to try out *note wait until the offer shows up at the end of the screen – here is a guide to get them sweet free credits )
- oracle cloud (can run on free tier)
- obviously you will need a domain name get one now from one of these top domain name registrars
- Namecheap – (There are offers right now check em out)
Installing Cyberpanel
The installation of Cyberpanel is fairly easy. The installation must be run as root (sudo will not work)
Firstly SSH into your fresh server as root (sudo user will not work)using your preferred way , you can then start the automated installation using the single command below
To learn what SSH is and how it works click heresh <(curl https://cyberpanel.net/install.sh || wget -O - https://cyberpanel.net/install.sh)you will then be presented with the following options
Type 1 and [Enter] to install Cyberpanel
1. Install Cyberpanel.
2. Addons and Miscellaneous
3. Exit.

Please enter the number[1-3]:1
Type 1 and [Enter] to install Cyberpanel with OpenLiteSpeed because we want the free version.
  RAM check : 119/1989MB (5.98%)
  Disk check : 2/80GB (3%) (Minimal 10GB free space)

  1. Install Cyberpanel with OpenLiteSpeed.
  2. Install Cyberpanel with LightSpeed Enterprise.
  3. Exit.

  Please enter the number[1-3]: 1
Full service is very useful to have for managing your storage, along with your web and mail servers. Let’s install them by pressing Y and hitting [Enter] to install full service for Cyberpanel
Install Full service for Cyberpanel? This will include PowerDNS, Postfix and Pure-FTPd.
Full installation [Y/n]:y
Hit [Enter] to select the latest version
Press Enter key to continue with latest version or
Enter specific version such as: 2.0.1 , 2.0.2 ...etc
Choose the default password(This is the best option), a random password, or set your own password by typing d, or r, or s. Then type [Enter]
Please choose to use default admin password 1234567,
randomly generate one (recommended) or
specify the admin password?

Choose [d]fault, [r]andom or [s]et password: [d/r/s] d
Next Type Y and [Enter] to install Memcached(only if u need it not necessary)
Do you wish to install Memcached extension and backend?
Please select [Y/n]:Y
Type Y and [Enter] to install Redis(only if u need it not necessary)
Do you wish to install Redis extension and backend?
Please select [Y/n]:Y
Type [Enter] to install Watchdog
Would you like to set up a Watchdog (beta) for Web service and Database service ?
The watchdog script will be automatically started up after installation and server reboot
If you want to kill the watchdog , run watchdog kill
Please type Yes or no (with capital Y, default Yes):
That’s the last configuration u have to do, now its time for the waiting game it should take about 5-30 minutes based on the internet connection of the server
Once we have installed and configured Cyberpanel, we will then see the following output:
###################################################################
                Cyberpanel Successfully Installed

                Current Disk usage : 8/80GB (11%)

                Current RAM  usage : 355/1989MB (17.85%)

                Installation time  : 0 hrs 23 min 5 sec

                Visit: https://your-server-ip:8090
                Panel username: admin
                Panel password: your-secure-password
                WebAdmin console username: admin
                WebAdmin console password: your-secure-password

             Run cyberpanel help to get FAQ info
             Run cyberpanel upgrade to upgrade it to latest version.
             Run cyberpanel utility to access some handy tools .

              Website : https://www.cyberpanel.net
              Forums  : https://forums.cyberpanel.net
              Wikipage: https://docs.cyberpanel.net

            Enjoy your accelerated Internet by
                Cyberpanel & OpenLiteSpeed
###################################################################
If your provider has a network-level firewall
Please make sure you have opened following port for both in/out:
TCP: 8090 for Cyberpanel
TCP: 80, TCP: 443 and UDP: 443 for webserver
TCP: 21 and TCP: 40110-40210 for FTP
TCP: 25, TCP: 587, TCP: 465, TCP: 110, TCP: 143 and TCP: 993 for mail service
TCP: 53 and UDP: 53 for DNS service
Would you like to restart your server now? [y/N]: y
Next, type y and hit [Enter] to configure the Firewall and restart your server.
PORTS
If your provider has a network-level firewall then make sure to open all the necessary ports they are:-(This is very important)
- TCP PORTS
- 8090 for Cyberpanel
- 80, 443 for webserver
- 21 and 40110-40210 for FTP
- 25, 587, 465, 110, 143 and 993 for mail service
- 53 for DNS service
- UDP PORTS
- 443 for webserver
- 53 for DNS service
Configuring Cyberpanel
Now that your cyberpanel installation is complete and you have opened all the necessary ports you can finally start configuring cyberpanel and host your first website
Visit your server’s IP address at port 8090. For example: https://your-server-ip:8090. You will see the following:-(Just click on advanced then click on Proceed to unsafe site)

You will then be redirected to the CyberPanel login page

Provide your admin username, password which if you chose as default will be admin for the username and 1234567 for the password
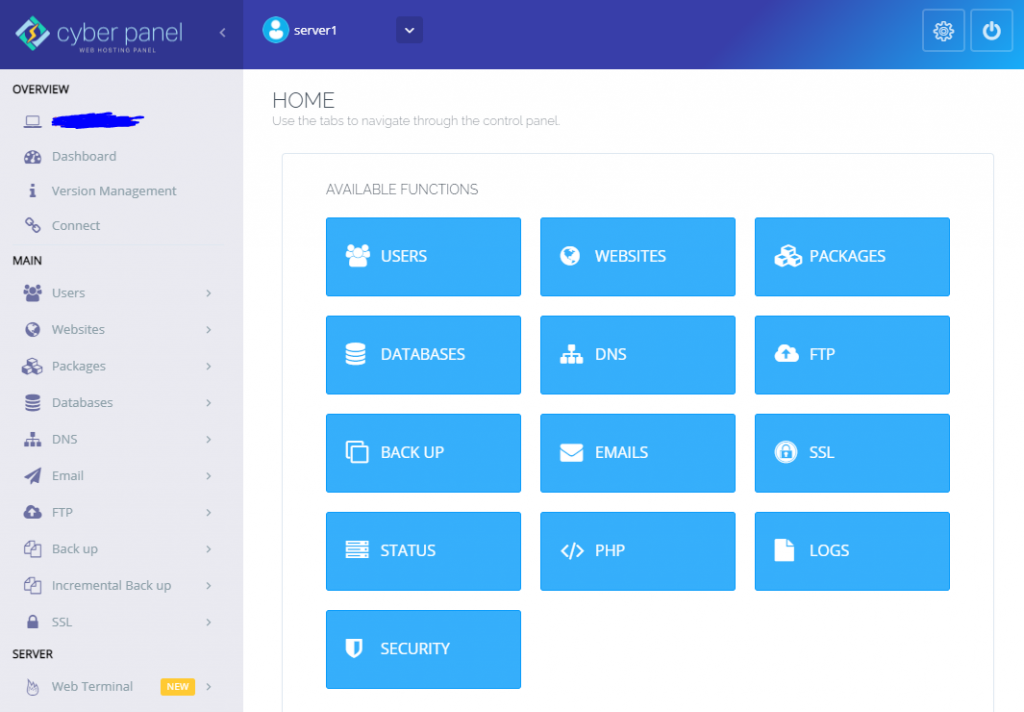
🥳🥳Wow you are done and are finally inside your server🥳🥳
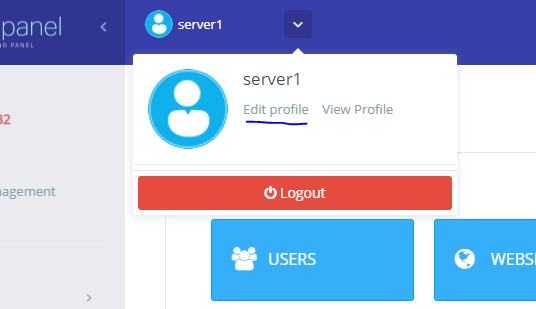
Conclusion
Your cyberpanel should be installed and ready to use! an important next step is to change your password and add your new secure password (Which can be done in Edit profile section)
Some popular options after installing cyberpanel are adding a hostname SSL so that you can access your server panel using a domain or subdomain learn how to do that in this article
If you want to Contact me please comment below or send me a Email through my CONTACT PAGE
Check out these other Help full guides:-
Cyberpanel installation guide
FileZilla Installation guide
Putty Installation Guide
Cyberpanel official documentation can be found here
Hello, just wanted to tell you, I liked this post.
It was inspiring. Keep on posting!
Pingback: Cyberpanel 404 not found error on all websites in server - Cyberpanel guides by site84.com
This is a great guide when will you make other guides like how to make my first website
soon
this is amazing